
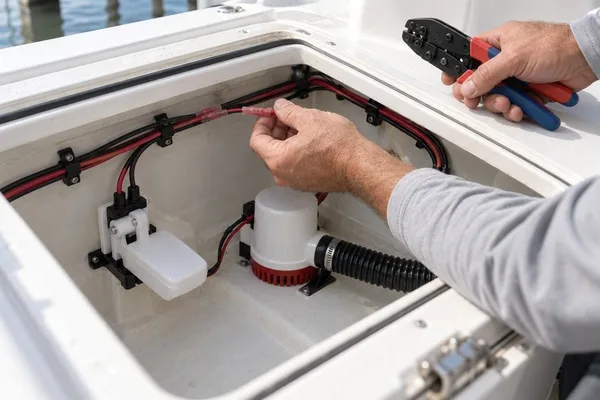
A reliable bilge pump install comes down to five things: correctly sized tinned wire, a fuse matched to the pump, sealed connections, a vertical mount where the float moves freely, and a full test of automatic and manual modes before you leave the boat. Miss one, and the pump either cycles all day or quits when the bilge actually floods.
This checklist is built around the Ultra Bilge Pumpswitch, but the principles apply to any automatic switch. Questions on a specific install? Contact our team or call (561) 320-3522.
What wire and fuse should you use?
Use stranded, tinned marine-grade copper wire sized for the pump's current draw and the full round-trip length of the circuit. Bilge pumps are critical circuits, so size for low voltage drop, not just ampacity. A long run from the house bank to the stern often needs a heavier gauge than the pump's leads suggest.
Untinned automotive wire wicks salt water and corrodes from the inside out, usually right at the terminals where you can't see it. Tinned strands resist that wicking and hold up in a wet bilge for years.
Fuse to the pump manufacturer's recommendation, never above the wire's capacity, and place the fuse as close to the power source as ABYC guidance calls for. On the Ultra Pumpswitch Senior, keep the pump load within its 15-amp rating. An oversized fuse protects nothing. An undersized one blows the first time the impeller drags.
Many techs wire the automatic circuit so it stays live when the main battery switch is off, since a boat sitting at the dock in a rainstorm still needs its pump. Follow the boat's design and the manufacturer's diagram for your setup.
How do you make connections that stay sealed?
Use adhesive-lined heat-shrink butt splices, crimp with a proper ratcheting tool, and shrink them until the adhesive flows out both ends. Then keep every connection up out of the bilge water, never sitting in it.
The Ultra Pumpswitch makes that easier. It ships with extra-long leads already sealed at the switch end, plus adhesive butt splices, so you can carry the connections up and away from standing water. Wiring instructions are stamped right on the switch body.
Skip twist-on connectors, electrical tape, and solder-only joints. Solder wicks and turns the wire stiff right next to the joint, which invites fatigue cracks from engine vibration and wave slap. A good crimp under sealed shrink is the standard for a reason.
Label both ends of each wire. The next tech to troubleshoot this boat, who may be you, will thank you. Check every connection against the official diagrams in our pumpswitch wiring instructions.
Where should you mount the switch for reliable float action?
Mount it vertically, low in the bilge, where the float can move freely and clear of the pump's discharge turbulence. The Senior uses a non-magnetic stainless bracket that mounts directly to a bulkhead or the pump itself, with about a 1 1/4" on and off differential.
Angle matters. A switch mounted off vertical, or on a surface that heels hard under way, can stick or trigger early. Keep it away from bilge sumps that collect hair, sawdust, and oily sludge, which can bind a float over time.
Watch for backflow too. If there's a long discharge hose without a proper loop or check arrangement, water can drain back after each cycle and restart the pump. That's one of the most common causes of nuisance cycling.
The Senior also has built-in timer delays and an isolated high-water alarm circuit that triggers at 3", useful for an independent warning if the primary pump can't keep up. Tight bilges may call for the Junior or Mini instead, so compare the full pumpswitch lineup before you order.
What mistakes cause nuisance cycling or pump failure?
Most problems trace back to the install, not the switch. Corroded or unsealed splices, undersized wire causing voltage drop, a float bound by debris, and a pump wired through a switch that's off all lead to failure. Backflow and poor mounting cause cycling.
We had a customer who was absolutely convinced he needed a new switch. He said his pump was acting unpredictably. Luckily, he had photos from when it was installed, which gave us a look at the wiring and connections. We gave him the proper instructions before he spent a lot of money replacing parts.
Before you leave the boat, test both modes. Lift the float or fill the bilge to confirm the automatic switch kicks the pump on and shuts it off cleanly. Then run the manual position at the helm panel. Check the indicator light, and if the alarm is wired, confirm it sounds at high water.
Ready to upgrade? Order the Ultra Bilge Pumpswitch Senior - 12V directly from Jupiter Boat Supply. Need help choosing? Call (561) 320-3522 or reach out to us.